 |
JTrac has all the features that you would expect from a standard issue-tracking application such as support for file-attachments and e-mail integration. JTrac offers powerful customization options, especially in the areas of workflow and field-level permissions and compares well to even commercial tools.
One of the useful features of JTrac is that it is distributed with an embedded web-application server (Jetty) that has a very small footprint. If you have Java 8 installed you can be up and running after downloading and extracting JTrac - by simply using the provided start and stop scripts. JTrac scans its environment on startup and if a configured database is not detected, HSQLDB is used by default.
If you already have a web-application server that you wish to use (such as Tomcat), you can just drop in the WAR file provided and sign on into the application straight-away.
You can refer the installation section of this document for more details. JTrac uses Hibernate and so it can use any database supported by Hibernate.
JTrac can be used to effectively track various kinds of things such as Bugs, Action Items and Tasks. You can easily add the following types of custom fields to a tracker Project (Space):
Drop Down List
Free Text Field
Date Picker
(Decimal) Number

Setting up custom fields for a project
There is a limit to how many custom fields of each type that you can configure for a Space. These limits have been set after careful consideration and would very rarely fail to suffice. They are as follows: Drop Down - 10, Free Text - 5, Numeric - 3, Date/Time - 3.
The screenshot below shows how creating a new item would look like for the typical project (space) where 'Severity', 'Module', 'Type' and 'Priority' have been defined as custom fields.

Creating a new item
Each tracker project that you create can have a different workflow. JTrac allows for complete customization of the tracker-item lifecycle, right down to the names of each intermediate state. It is possible to create very sophisticated workflows and a visual "map" of the workflow being edited is displayed below the state-transition toggle-buttons to make it easier to manage.
The default workflow shown below is ideal if you simply want to track issues with just two states - Open and Closed. However, with just a few mouse clicks, you can turn this into a complex workflow involving multiple states.
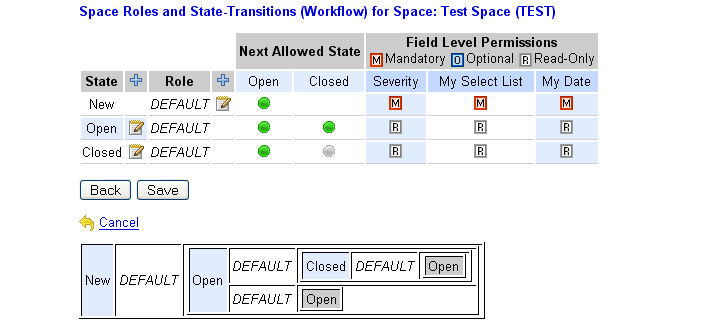
Default workflow - before customization
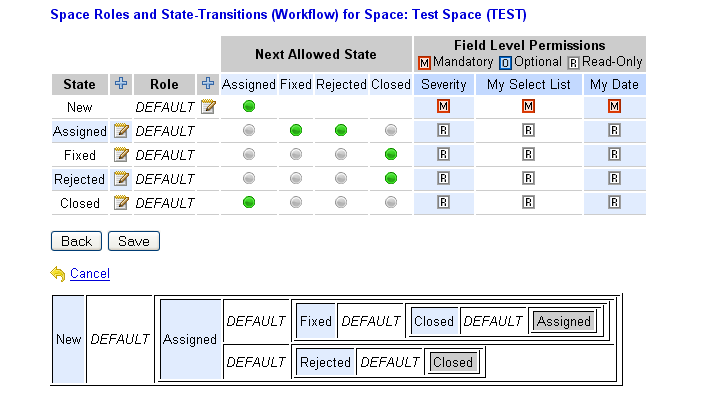
Example of a workflow - after customization
You can even configure whether or not changing of values is permitted given the current state within the workflow - and that too at a field-level. This flexibility allows for some interesting possibilities. For example, assume that you want to maintain a "percentage complete" field that can be updated at any time during the life-cycle of an item. The screenshot below demonstrates how you can set up a drop down field called "% Complete":
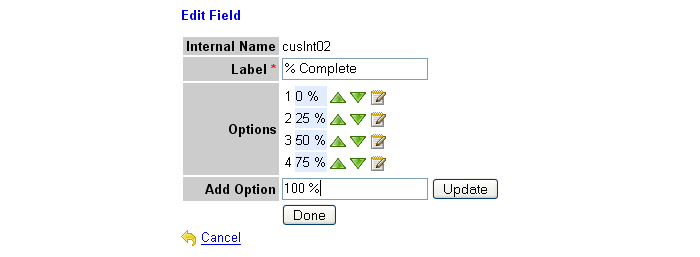
Setting up of a drop down custom field called "% Complete"
Then when customizing the roles and field-level permissions, all you need to do is specify that the "% Complete" field is editable even when the status is "Open".
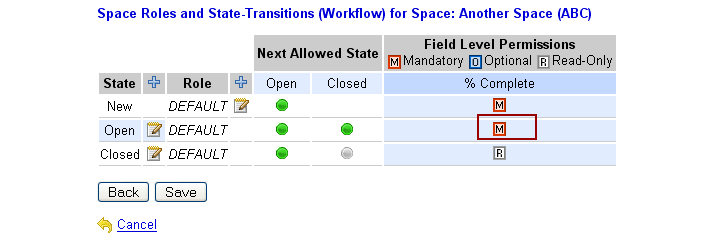
Making a custom field editable when updating an item (after new item has been created)
This results in the "% Complete" field being available for updating whenever anyone views an item with a status of "Open". Notice also how the "% Complete" field is added as a column to the "History" section so that the complete history of changes to this custom field can be viewed.

Example of a custom field that can be updated even when status is "Open"
JTrac provides a very detailed history view that completely captures all comments or status changes for an item. The history can be seen when viewing an item as shown above.
You can upload file attachments at the time of creating of an item or as many times as required after an item has been created.
JTrac customization does not stop at workflow - you can also define different roles for each tracker project that you set up. This allows for power and flexibility. For example you could enforce that a "DEVELOPER" role can only mark "Assigned" items as "Fixed" and that only a "TESTER" role has the power to mark a "Fixed" item as "Closed". You can even disallow selected roles from being able to create new items. JTrac gives you complete control over the workflow and you can easily tweak it to fit your existing process rather than the other way around.

Example of workflow where each role has clearly defined responsibilities.
In the example above, the roles highlighted in red on the visual "map" of the workflow being edited mean that at these points in the workflow - a user with the given role can assign only to other roles. So in this case, the TESTER can assign a New item only to a DEVELOPER role and not another TESTER. And when an item is in the "Assigned" state, a DEVELOPER can only assign to a TESTER when changing the status to "Fixed" or "Rejected".
Field-level permissions can be mapped to roles which allows for even more flexibility. For example, you can set a project up so that only a "MANAGER" can change the "Severity" level after a bug is submitted. JTrac makes it possible for you to define very complex workflows, complete with both Status and Role dependent field-level permissions, and you can do all this within a single admin screen.
The intuitive search screen (shown below) allows for easy execution of common queries such as find all items "logged by" or "assigned to" a user (or users). JTrac allows for filtering even on custom fields.
You can navigate back to the search setup screen from the search results screen and have the search parameters still active. This is useful when trying to tweak complex queries by trial and error.

The search screen - which allows filtering on custom fields
The default view when you log into JTrac is a very handy dashboard view that provides the most frequently used statistics at a glance. You can click on any of the numbers to immediately bring up the search results view listing the items matched. For example, clicking on the count of items "Logged By Me" would immediately display the list of items initiated by the currently logged in user.

Statistics at a glance and search results available with just one click
For each Space, you can also drill-down to a finer level of detail by clicking on the right-arrow 'expand' icon. This expands the dashboard rows so that you can see a break-up of item counts, not only by whether 'logged by me' / 'assigned to me' - but against the custom workflow states defined for the Space as well. Again, it is possible to directly navigate to the items by clicking on the dashboard numbers.
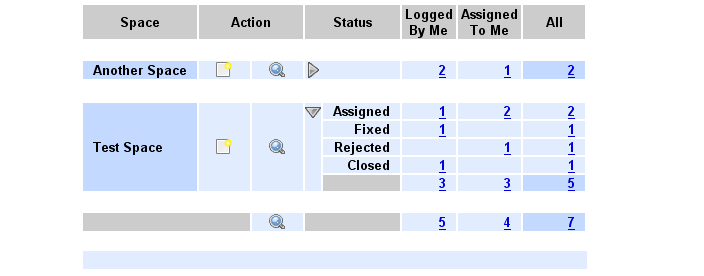
Expanded statistics for a Space showing counts by workflow status
The dashboard can also be configured to display a list of links that are relevant to the project, or shortcuts to saved searches. (Search result pages contain all search parameters in the URL, so it's possible to bookmark a search like "all open or in-progress tickets"). For easy access those, but also entirely different links, can be displayed on the dashboard. The links are configured under "OPTIONS -> Configure links" as shown below. Links can be set to open in the same window/tab, or in a new one.
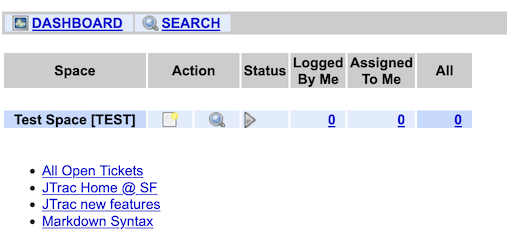
A dashboard displaying a saved search and some external links

The settings for the links shown above
In addition to be able to search within a single space (project) JTrac allows for searching across all (or a sub set of) projects that a user is mapped to. For example, in the screenshot of the dashboard above, there are two projects. The "SEARCH" link at the top of the page (as well as the "search" link on the "totals" row) would bring up the search wizard that can search across all (or a subset of) the spaces assigned to the currently logged in user.
The summary and even the detailed descriptions of items are indexed and can be searched. Note that if you are upgrading or migrating databases, you may need to "re-index" which is an option available to admin users.
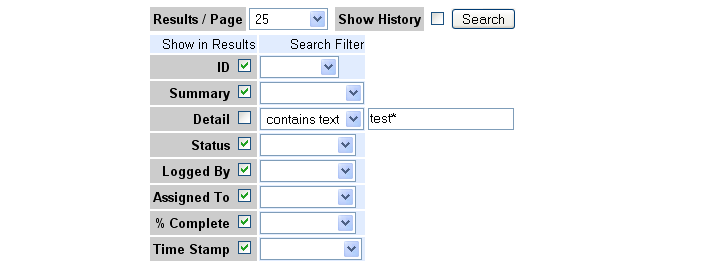
Lucene powered full text search with wildcard support
JTrac is able to export the results of any search (or all items in a Space) as an Excel Sheet. The link for this appears at the top right of the search results screen.

Download search results as an excel sheet
One the data is in a spreadsheet, it is very easy to analyze data and do things like creating pivot-tables and charts. Many users use the 'export to Excel' feature to fulfil custom reporting requirements.
Most users will use only five screens in JTrac: Dashboard, Create, View, Search and Results. Navigation has been designed with usability and simplicity in mind. A screenshot of the search results screen is shown below.
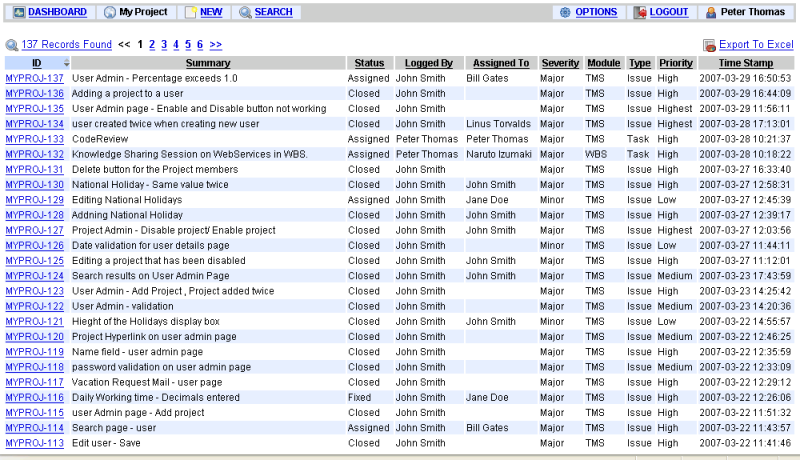
The search results screen
You can establish bi-directional links between items. For example you can mark an item as being a "duplicate of" another item. You can easily navigate to related items (and back) when viewing any particular item.
The option to add related items is available when viewing an item after it is created. The navigation is designed so that you have the option to execute a search before selecting an item to cross-reference.
When setting up a Space you can define whether this space can be viewed by users without having to log-in. It is also possible to make a space inactive - in which case it will not be shown on the dashboard.
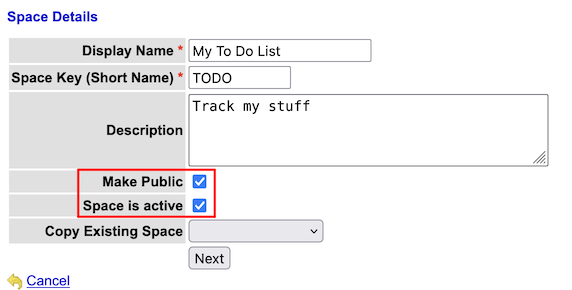
Specify if read-only anonymous access is allowed per-space, and whether a space is active
All status changes for an item will trigger e-mail notifications by default. You can choose to add multiple users into a "notify list" at the time of raising a new item or updating the history for an item.

Add multiple users to a "notify list" while creating or updating an item
The e-mail content is very nicely formatted HTML and is laid out in the same way as how the screen looks within JTrac when viewing an item. Users do not need to get used to a different or possibly less pleasing format such as plain-text.

Example of an e-mail sent by JTrac
Admin users can configure the SMTP / e-mail server that JTrac should use in the "Manage Settings" page. This page can be accessed from the "OPTIONS" menu. JTrac also can handle an e-mail server that requires authentication or even a secure connection over HTTPS.
JTrac has complete internationalization support and you can change the user interface language instantly by editing your user-profile. Adding a translation is very easy and does not require any Java development expertise. See this section of the developer guide for more details and please consider contributing translations to the JTrac project.
JTrac has already been translated into the following languages:
Arabic - ar
Czech - cs
German - de
Greek - el
Spanish - es
Spanish (Argentina) - es_AR
Spanish (Mexico) - es_MX
French - fr
Hungarian - hu
Italian - it
Japanese - ja
Korean - ko
Dutch - nl
Norwegian - no
Polish - pl
Portugese (Brazil) - pt_BR
Russian - ru
Slovenian - sl
Swedish - sv
Turkish - tr
Ukrainian - uk
Chinese (China) - zh_CN
Chinese (Taiwan) - zh_TW
JTrac has built-in support for authenticating user credentials against an LDAP or Active Directory server. Please refer the LDAP section of the installation guide for more details.
JTrac also has support for integrating with a Central Authentication Service (CAS) installation. The install guide has more details on how to configure single sign-on using CAS.